 Skip to content
AdiNexusFT User Manual
A complete web version of the AdiNexusFT manual covering login, gateway connection, barcode and Bluetooth workflows, network commissioning, diagnostics, OTA firmware update, logs, maintenance commands, factory reset, troubleshooting, and first-time commissioning.
AdiNexusFT — Gateway Commissioning Application
Version 1.0 • App: AdiNexusFT • Platform: Android • Prepared by AdiInfi IT Solutions

Introduction
AdiNexusFT is a professional Android app for configuring, commissioning, and monitoring AdiNexus industrial IoT gateways over Bluetooth Low Energy.
What is AdiNexusFT?
It gives field engineers and plant operators wireless control over gateway setup and maintenance without cables, laptops, or direct network access. It supports first-time setup, network updates, connectivity checks, diagnostic review, and troubleshooting log retrieval.
Who Should Use This Manual?
- Field Engineers and System Integrators for network setup, gateway commissioning, and firmware updates.
- Plant Operators and Technical Staff for health checks, diagnostics, logs, and routine maintenance.
| Before You Begin | Details |
|---|---|
| Application Name | AdiNexusFT |
| Platform | Android smartphone or tablet |
| BLE Required | Yes — Bluetooth must be enabled on your phone |
| Location Required | Yes — Android requires Location permission for BLE scanning |
| Internet Required | Only for login and OTA firmware updates |
| Credentials | Provided by your AdiInfi-authorised dealer or administrator |
Getting Started
Requirements
- Android smartphone running Android 6.0 (API 23) or later
- Bluetooth enabled on the phone
- Location permission granted to AdiNexusFT
- AdiNexusFT credentials: Client ID, Username, Password
- Gateway powered on and within approximately 10 metres during commissioning
Activating BLE Commissioning Mode on the Gateway
- Locate the commissioning button on the AdiNexus gateway hardware.
- Press and hold the button for 10 to 20 seconds. Do not release early.
- Wait for the LED to alternate red and blue with a 2-second delay.
- Open AdiNexusFT and proceed to the Bluetooth scanner.
Application Overview
The application follows a clear user journey from app launch to gateway commissioning and diagnostics.
App shows splash screen and checks for a saved login token.
Enter Client ID, Username, and Password provided by the administrator.
View the Gateway Details dashboard and start Bluetooth connection if needed.
Press and hold gateway button for 10–20 seconds until LED alternates red and blue.
Open Bluetooth in the drawer, scan, and tap Connect on AdiNexus-XXXX.
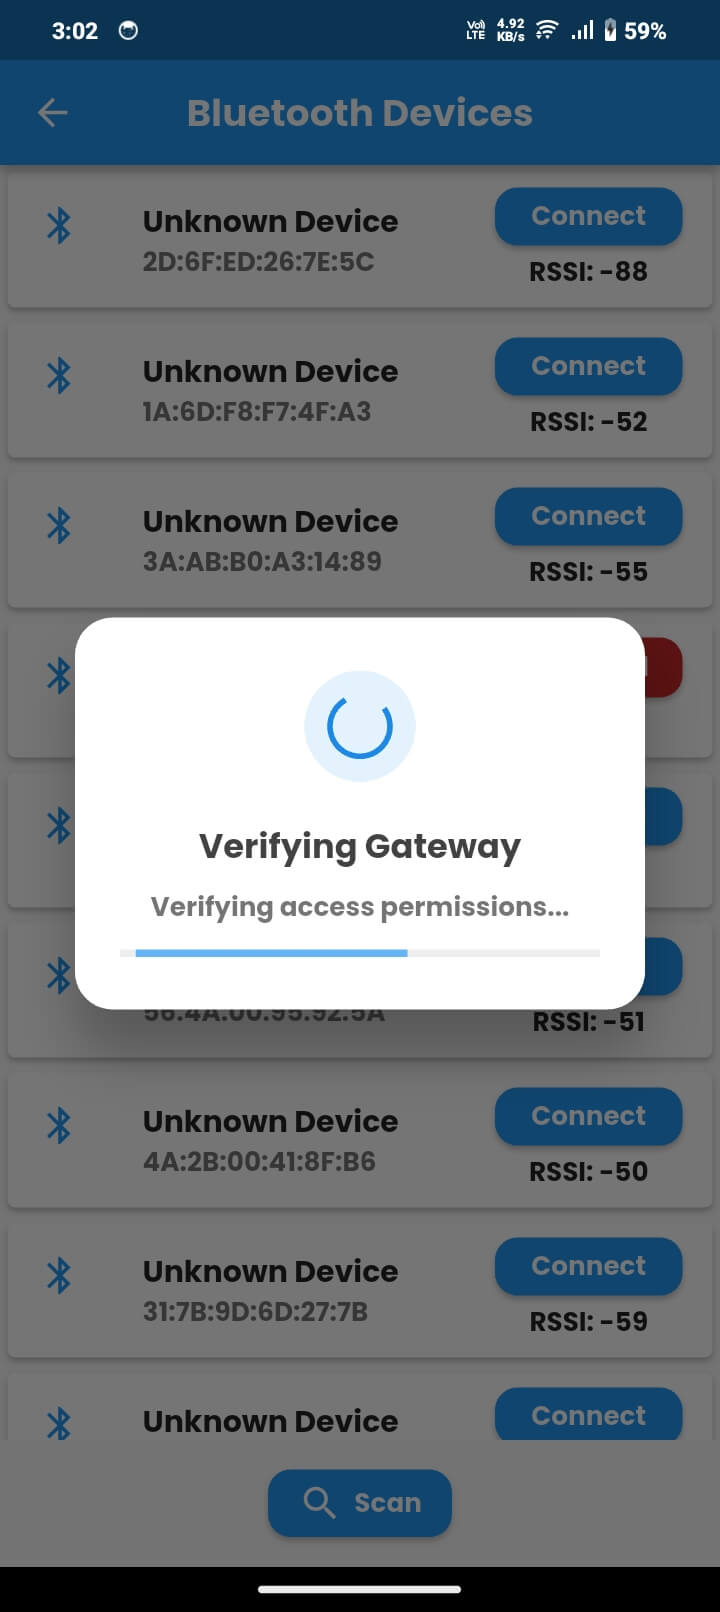
App verifies your access with the cloud server and shows granted or denied access.
Home screen shows Gateway Name, UID, Model Code, and MAC addresses.
Configure Wi‑Fi, Ethernet, GSM, and MQTT settings from the Commission menu.
Check gateway health from Gateway Diagnostic in the drawer.
Gateway is commissioned, cloud-connected, and BLE can be disconnected.
Application Layer Architecture
Your Phone: AdiNexusFT app handles login, BLE scanning, network configuration forms, diagnostics, OTA updates, and log streaming/export.
BLE Connection: Range up to about 10 metres, JSON commands from app to gateway, JSON notifications from gateway to app, chunked file transfer, and server-verified access.
AdiNexus Gateway: ESP32 firmware supports Wi‑Fi, Ethernet, GSM, MQTT, NVS storage, SD card logging, OTA partition, and cloud transport.
AdiInfi Cloud: Supports login authentication, access verification, OTA firmware manifest, and configuration storage.
Login & Authentication
4.1 Splash Screen
When you open AdiNexusFT, the splash screen appears for approximately one second while the application initializes. If a previous session token is still valid, the app navigates directly to the Home screen.
4.2 Login
If no valid session exists, the Login screen appears. Enter the credentials provided by your AdiInfi-authorised administrator or dealer.
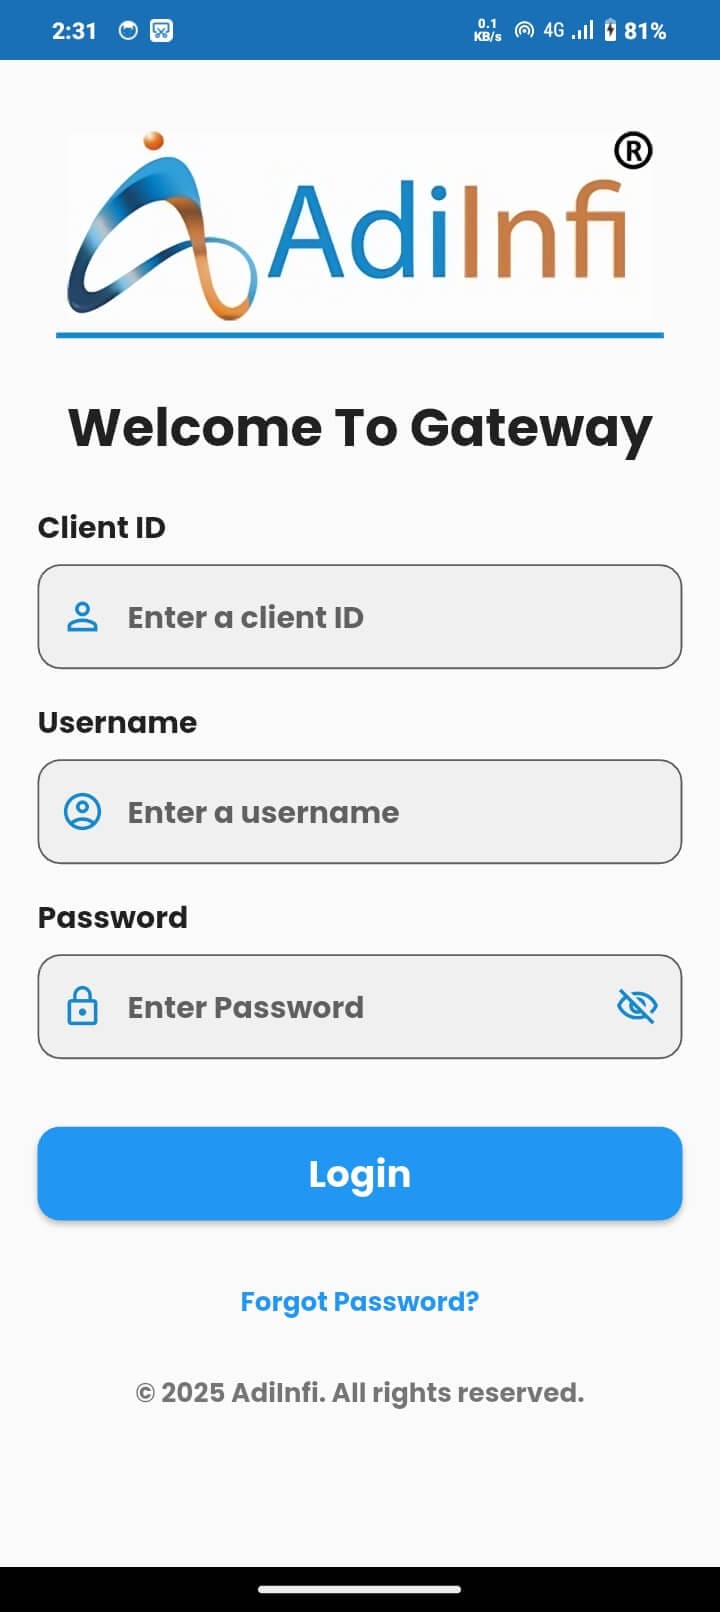
The unique identifier for your organization's account.
Identifies your individual account within the organization.
Use the eye icon to show or hide the password as you type.
The app verifies your credentials against the AdiInfi cloud server.
You are taken to the Home screen with the Connect via Bluetooth button.
Home Screen & Navigation
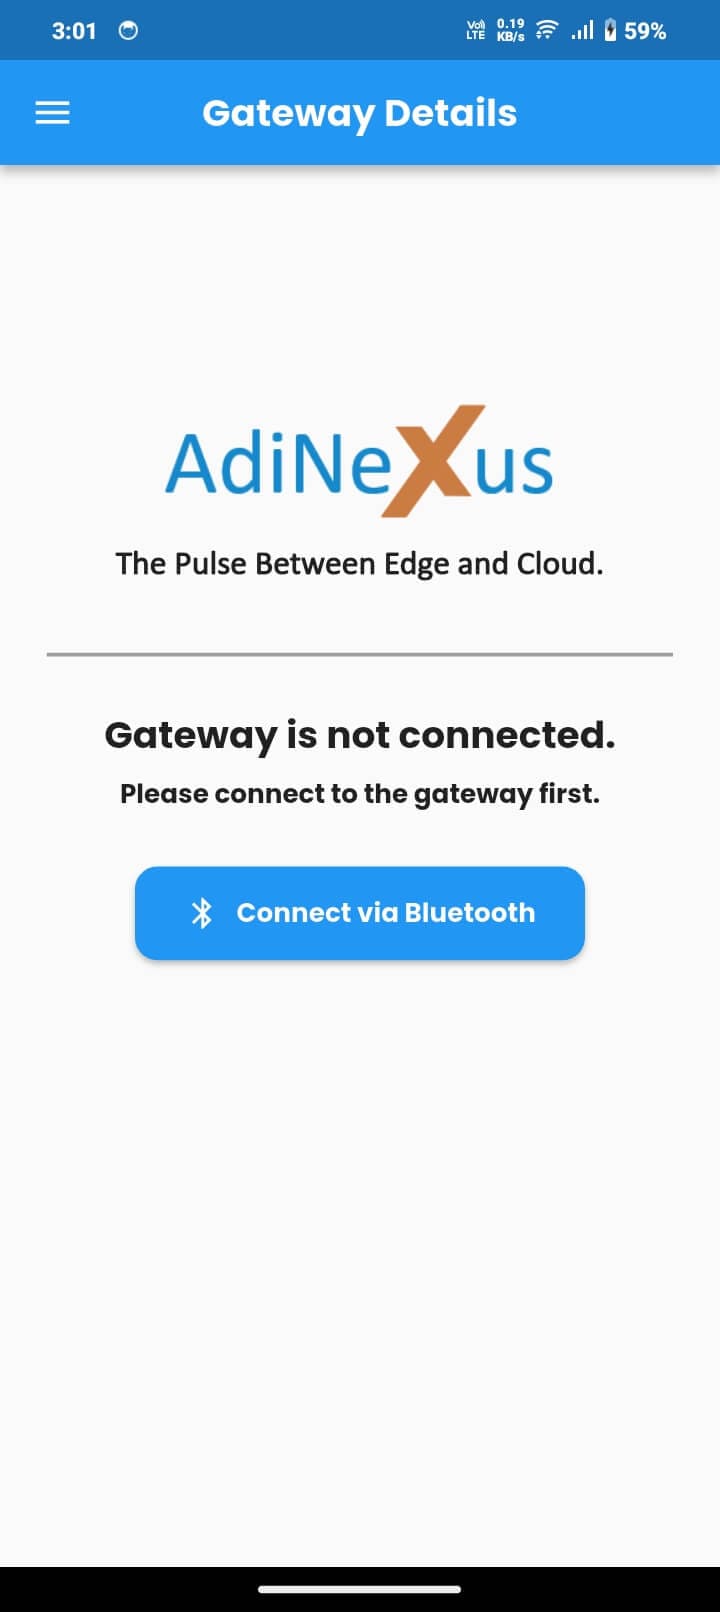
After successful login, the app opens the Home screen. Initially the gateway may not yet be connected.
5.1 When No Gateway is Connected
The Home screen shows the AdiNexus logo, the message “Gateway is not connected.” and a Connect via Bluetooth button that opens the Bluetooth scanner.
5.2 Scan Available Devices
The Bluetooth scanner searches nearby BLE devices and lists each device name, MAC address, RSSI signal strength, and a Connect button.
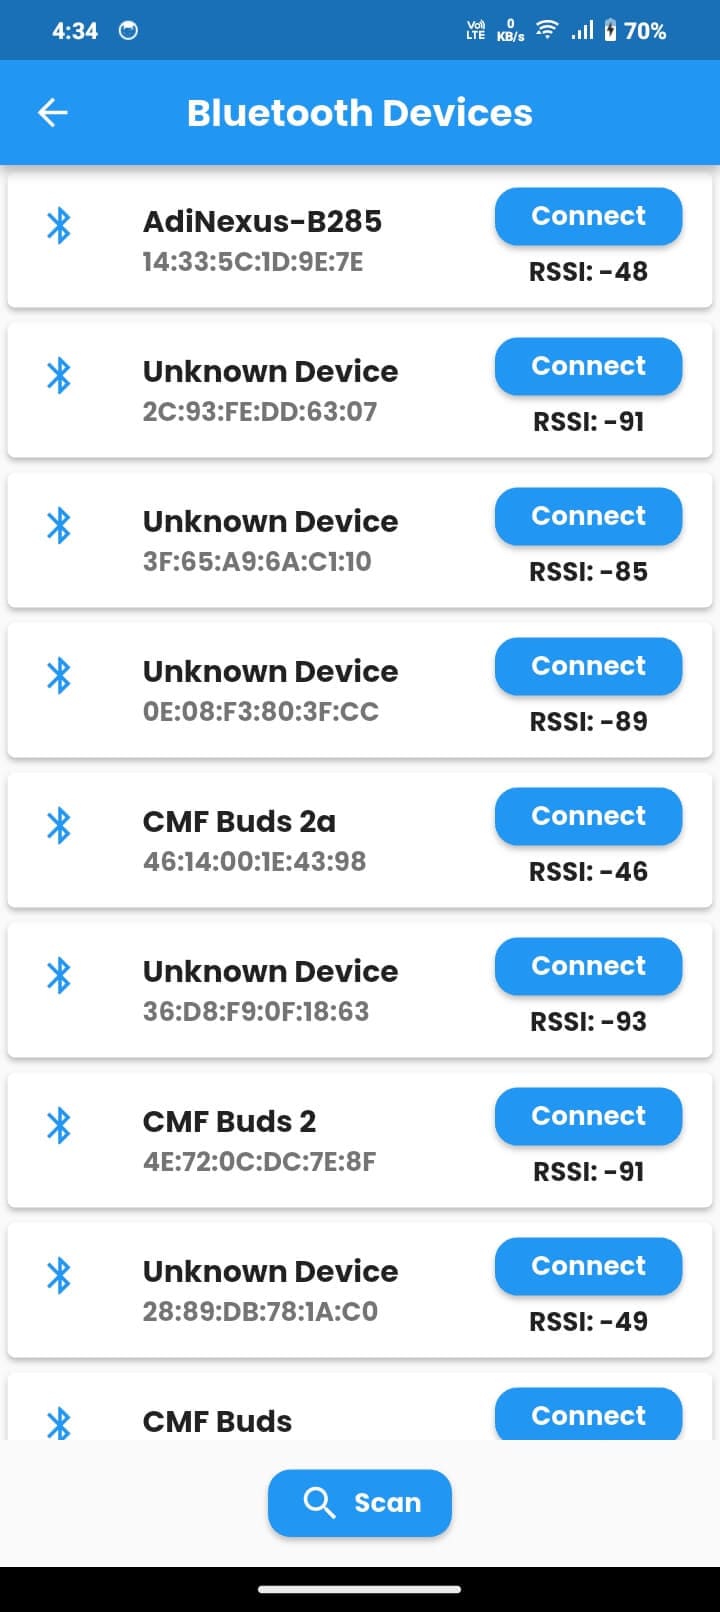


Steps to Connect via Bluetooth
| Side Drawer Item | Purpose |
|---|---|
| Gateway Connect | Bluetooth scanner and Barcode scanner used to connect to a gateway |
| Commission | Configure Ethernet SPI/RMII, Wi‑Fi, GSM/4G, MQTT, and full configuration transfer |
| OTA Update | Download and install firmware updates to the connected gateway |
| Gateway Logs | Retrieve and view gateway SD card log files |
| Gateway Diagnostic | View a real-time health snapshot of gateway subsystems |
| Other Commands | Gateway Restart and SD Card Format commands |
| Factory Reset | Restore network settings or perform a full factory reset |
| Change Password | Change your AdiNexusFT account password |
| Logout | Sign out of the application |
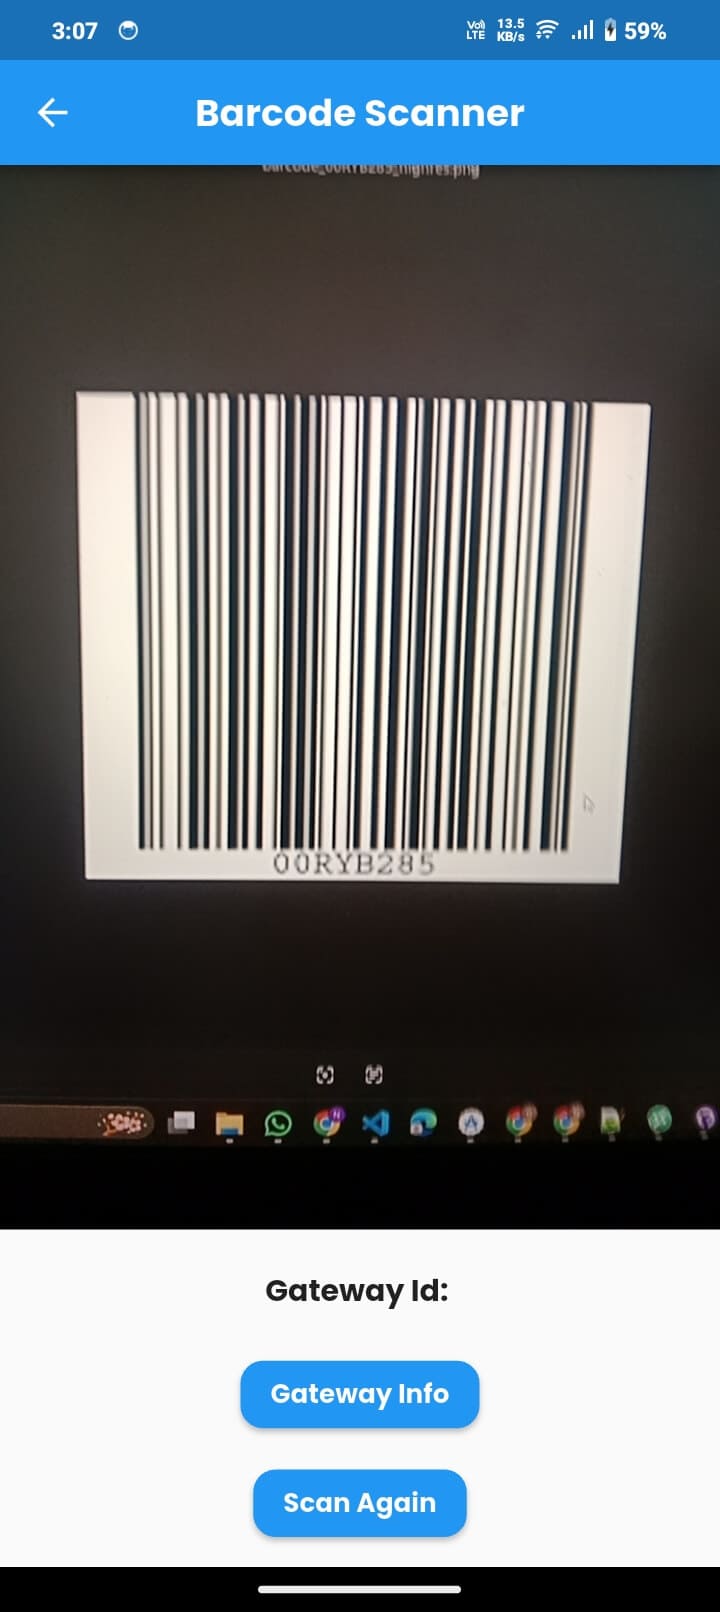
Connecting via Barcode Scanner
Each AdiNexus gateway has a unique barcode that encodes its UID, allowing fast identification without scrolling through a Bluetooth device list.
Network Commissioning
Network commissioning configures the gateway network interfaces so the gateway can connect to the site network and communicate with the AdiInfi cloud.
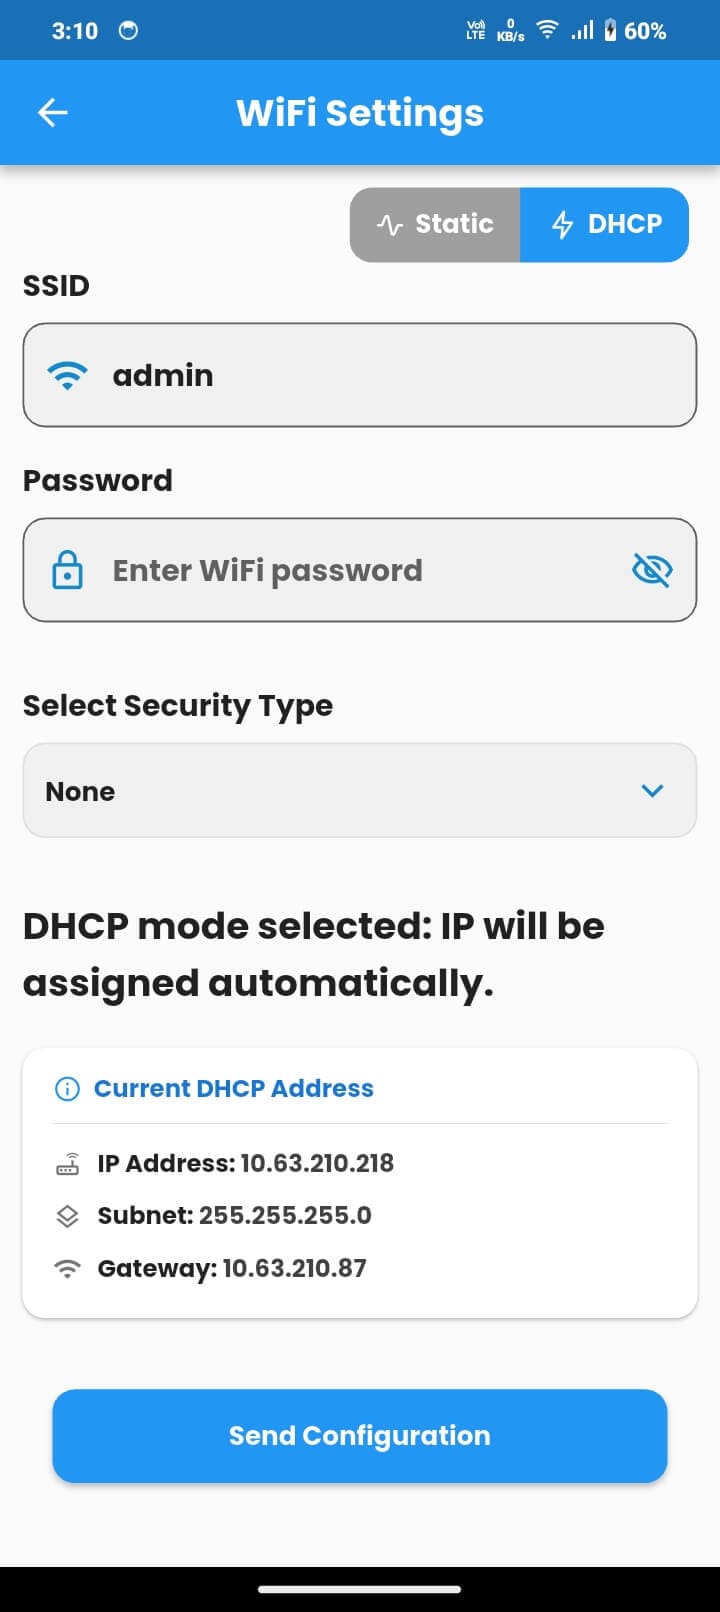
6.1 Wi‑Fi Settings
DHCP Mode
Select the DHCP toggle. No manual IP fields are required. When already connected, the Current DHCP Address card shows the live IP address, subnet, and gateway assigned by the router.
Static IP Mode
Manually assign a fixed IP address and enter all required network details. This is useful when the gateway must always appear at a predictable address.
| Wi‑Fi Field | Description |
|---|---|
| SSID | Name of the Wi‑Fi network |
| Password | Wi‑Fi password; use eye icon to show or hide |
| Security Type | None, WPA2‑Personal, WPA2/WPA3‑Personal, or WPA3‑Personal |
| IP Address | Fixed IP address for the gateway |
| Subnet Mask | Network subnet mask |
| Gateway | Router IP address |
| Primary DNS | Primary DNS server |
| Secondary DNS | Optional secondary DNS server |
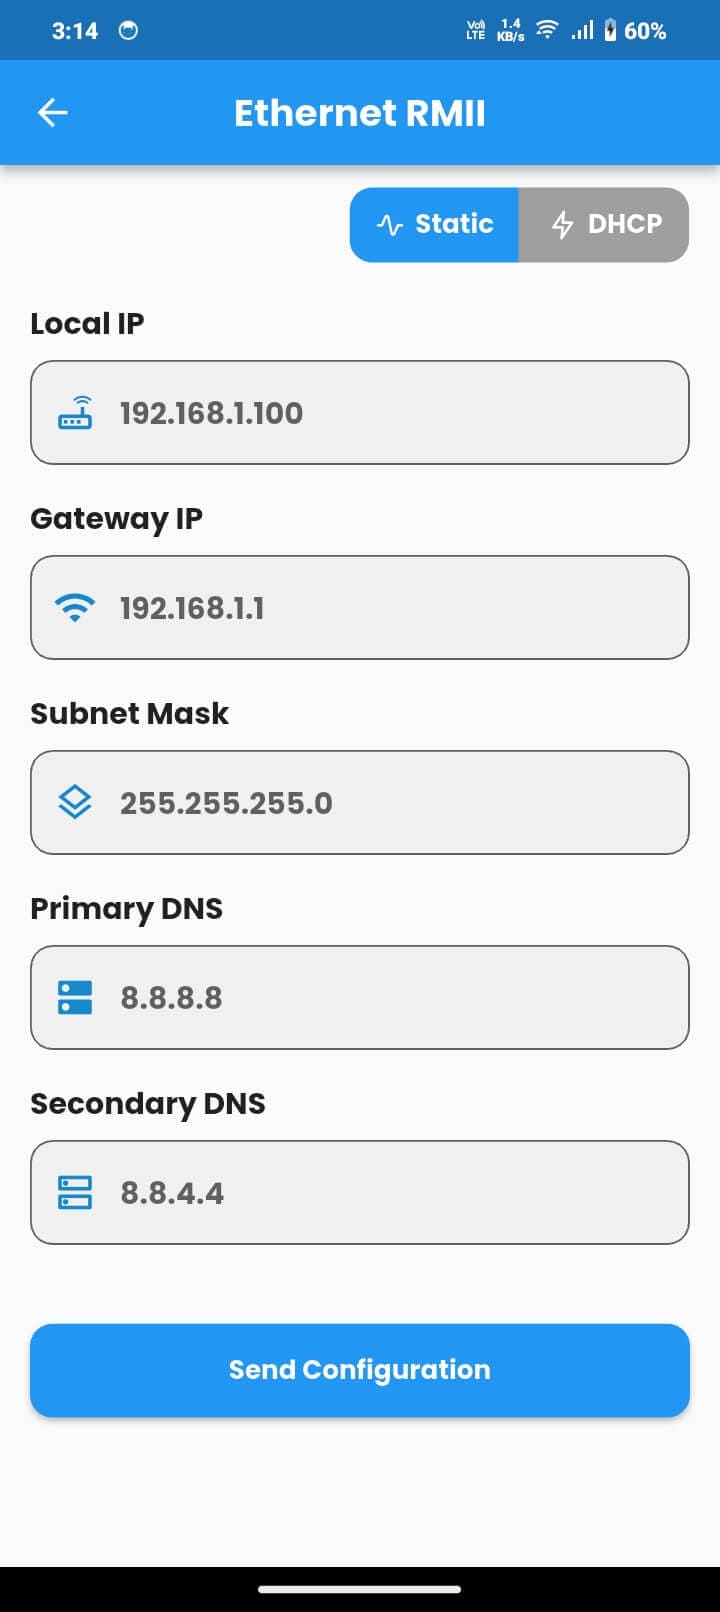
6.2 Ethernet RMII Settings (LAN8720)
This screen configures the built-in Ethernet RMII port used on all AdiNexus hardware variants. It supports DHCP or manual static IP fields identical to Wi‑Fi static configuration.
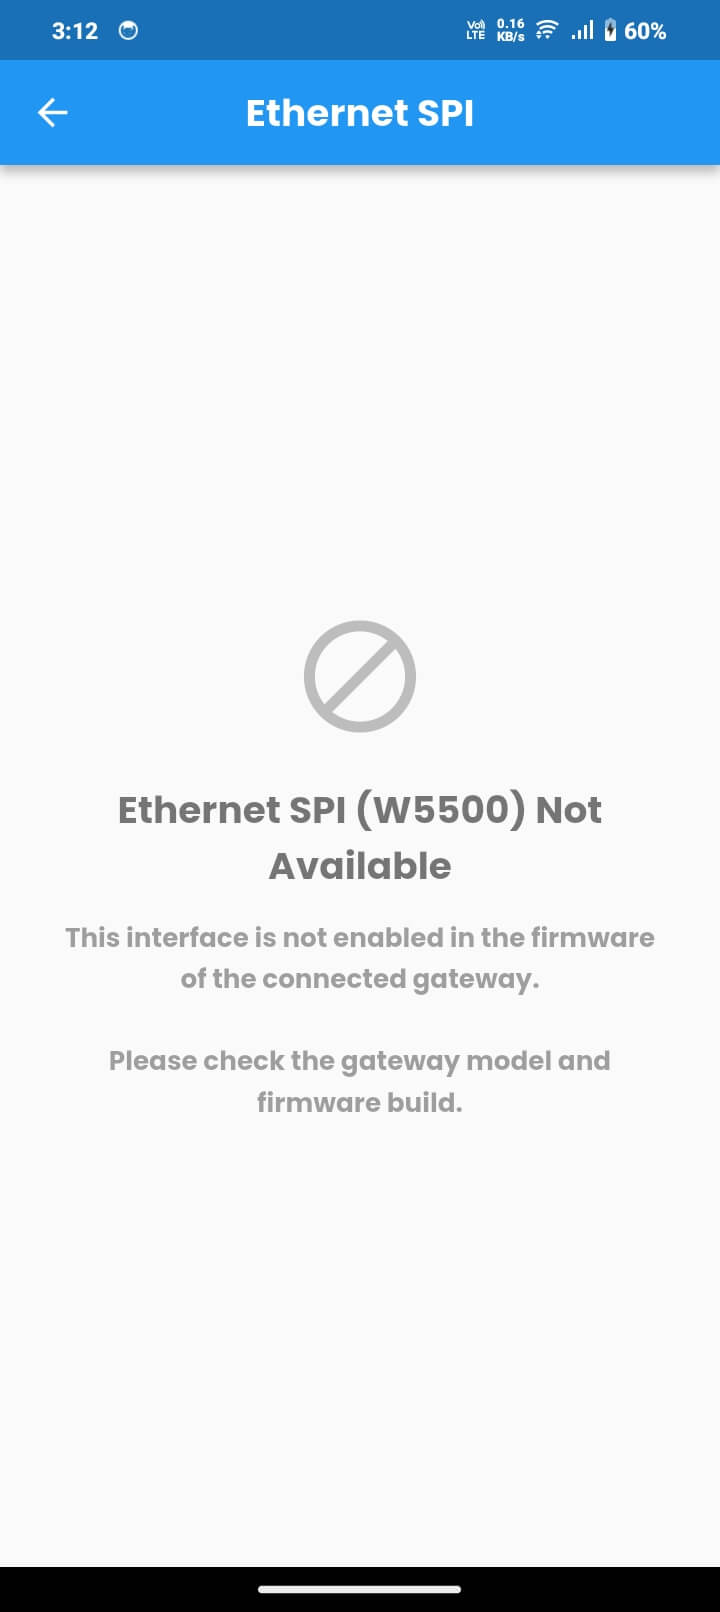
6.3 Ethernet SPI Settings (W5500)
This screen configures the W5500 SPI Ethernet interface available only on specific AdiNexus v2 ELITE hardware variants. If unsupported, the screen shows a Not Available banner.
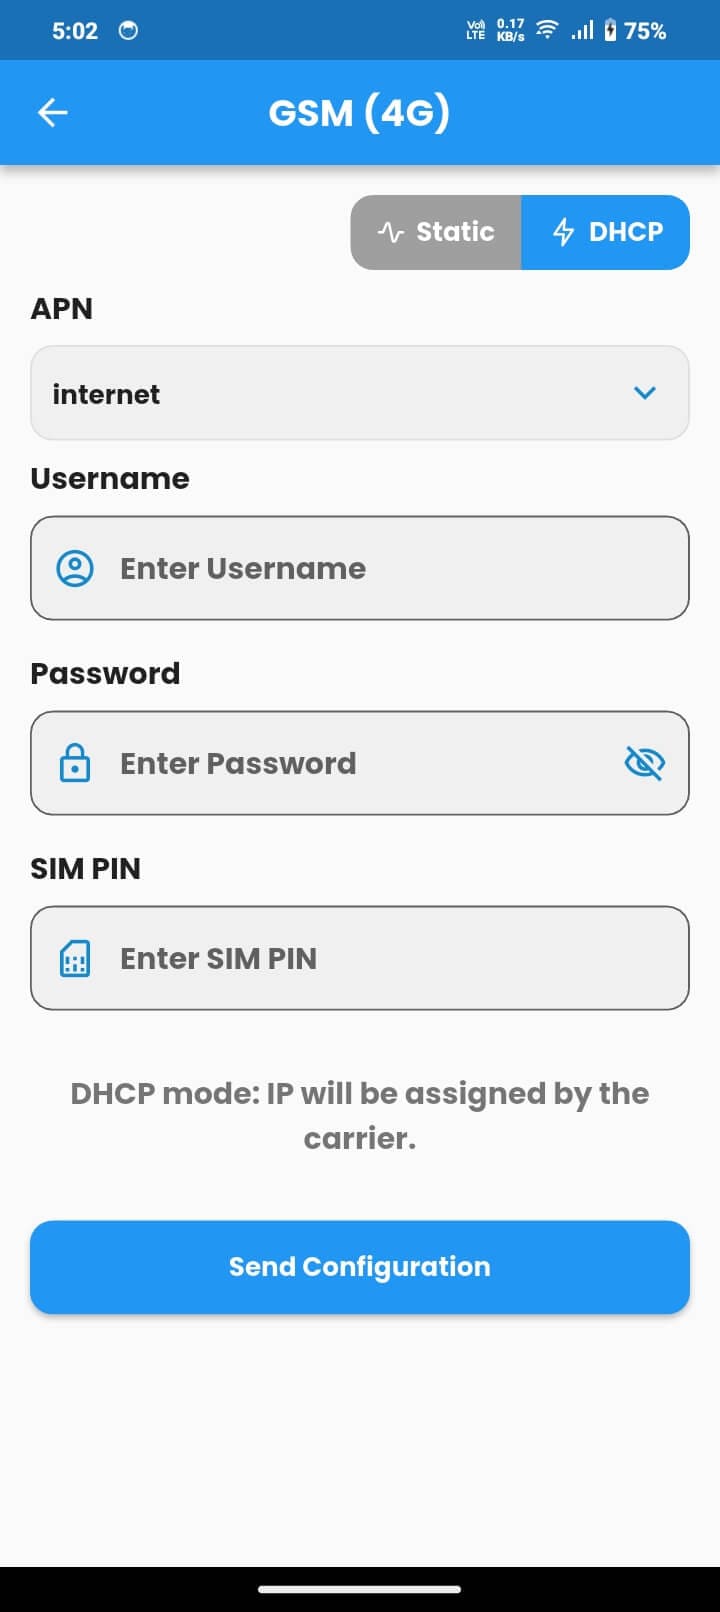
6.4 GSM / 4G Settings
Used on gateway models with a GSM modem. The gateway can use cellular internet through a SIM card as a primary or backup network path.
| GSM / 4G Field | Description |
|---|---|
| APN | Access Point Name for the SIM carrier |
| Username | Carrier APN username if required |
| Password | Carrier APN password if required |
| SIM PIN | PIN code for the SIM card, if configured |
| DHCP / Static | Use carrier-assigned IP or enter manual IP, subnet, gateway, and DNS |
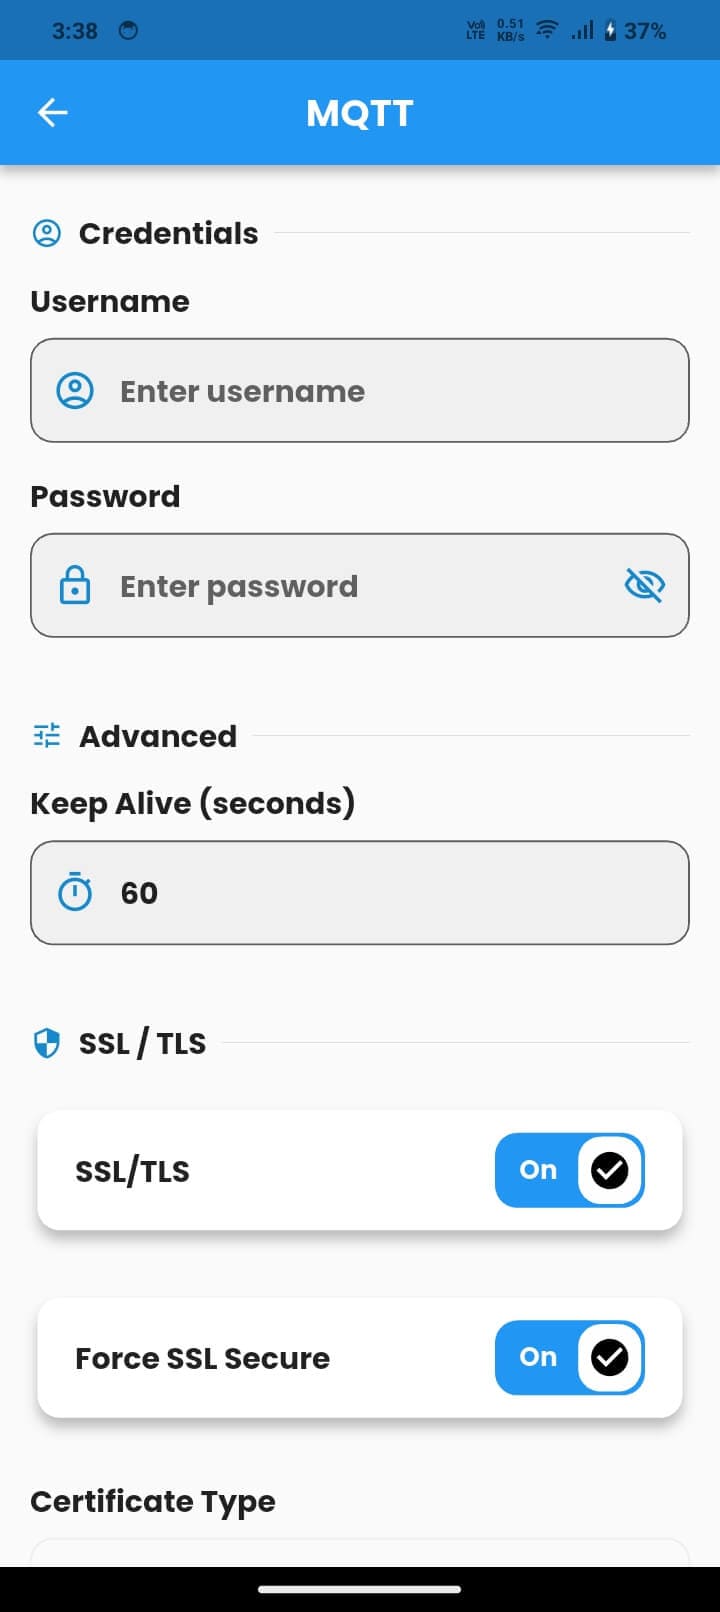
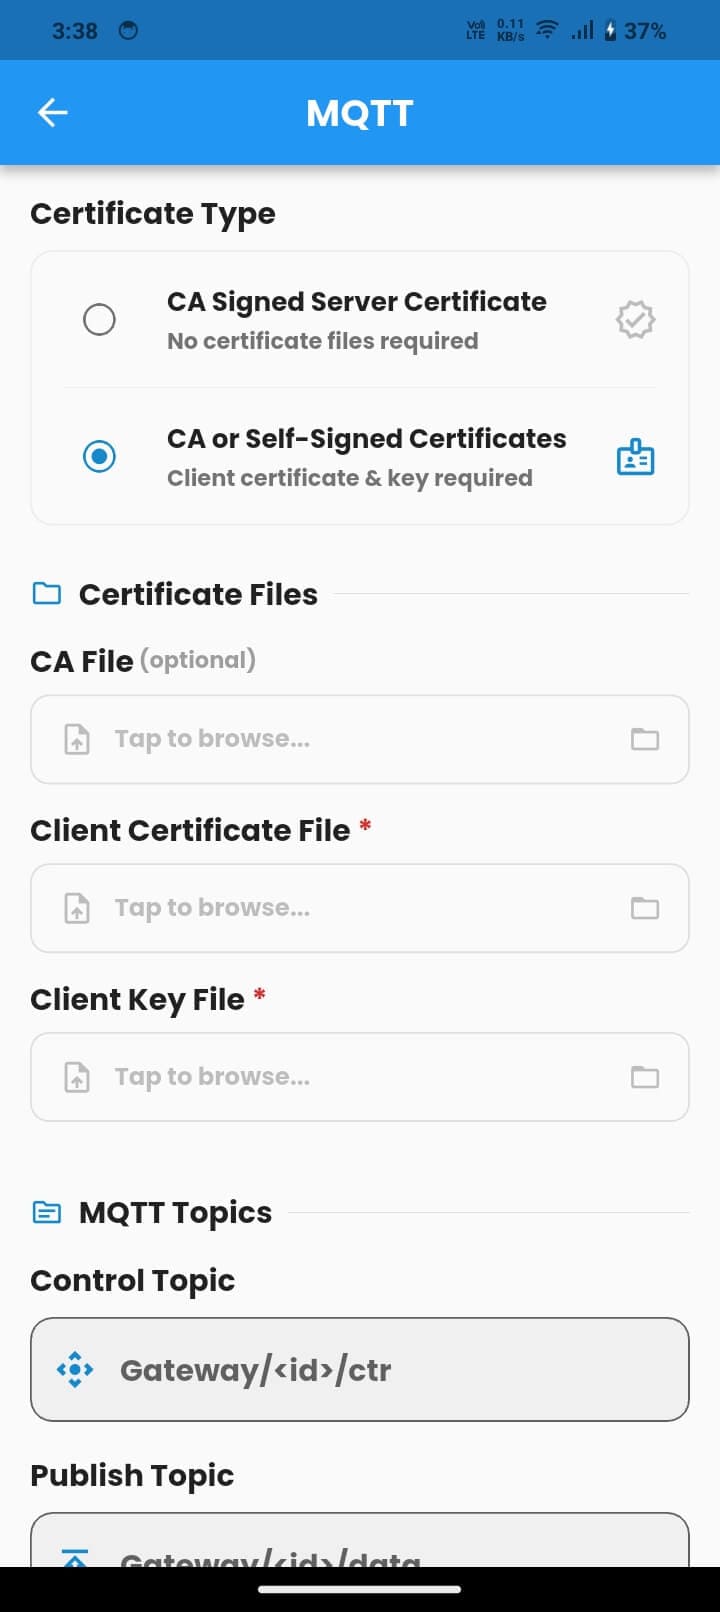
6.5 MQTT Broker Configuration
MQTT is the cloud communication protocol used by AdiNexus gateways to send data and receive commands. This screen is visible for gateways configured as third-party gateways and allows updates to MQTT settings, certificates, and keys.
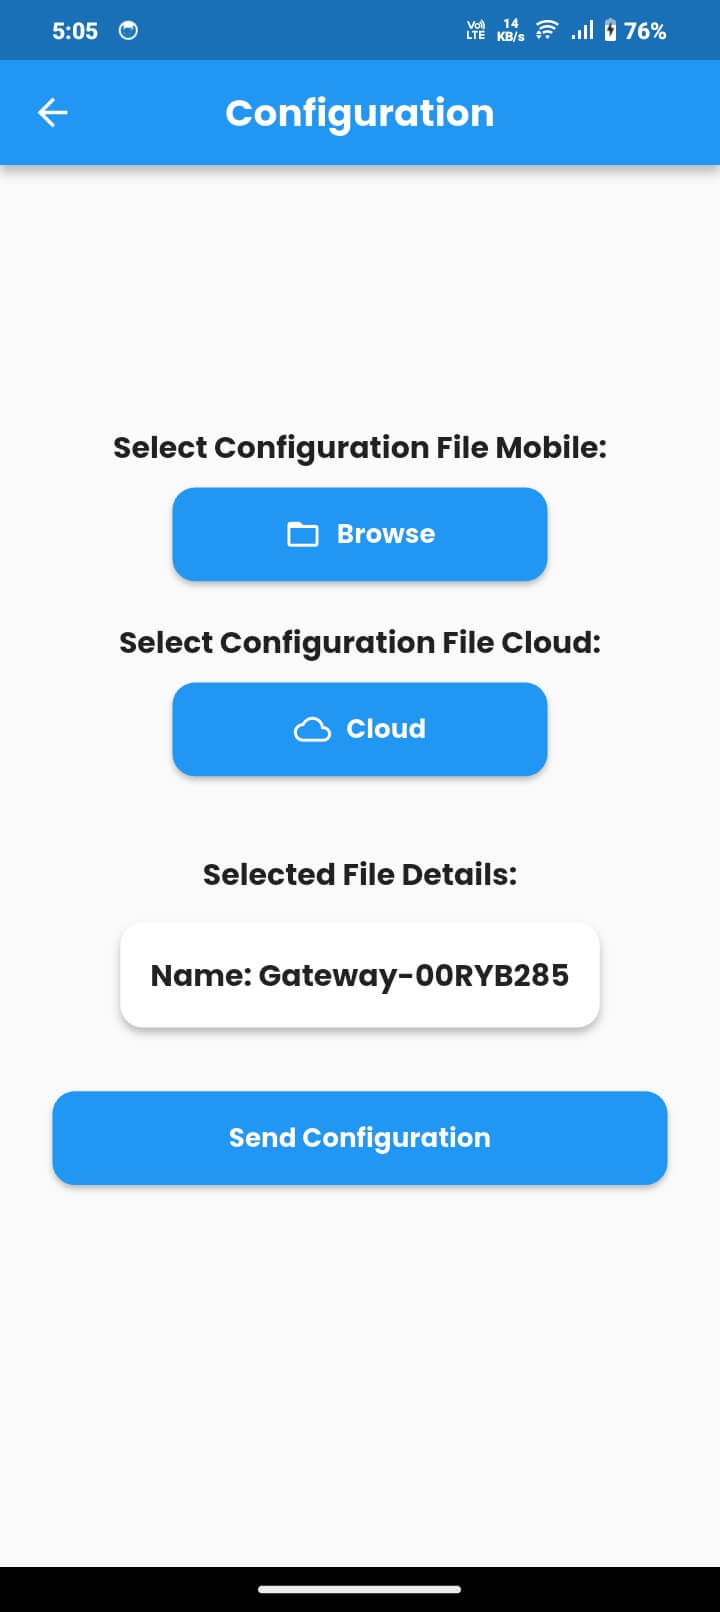
6.6 Full Configuration Transfer
This screen sends a complete gateway configuration file in one operation, typically during initial deployment.
- Browse: Choose a configuration file from your Android device.
- Cloud: Fetch the configuration file directly from the AdiInfi cloud server.
Once selected, the gateway name from the file appears under Selected File Details. Tap Send to transfer the file in chunks over BLE. A progress indicator shows the transfer status, and the gateway restarts automatically when complete.
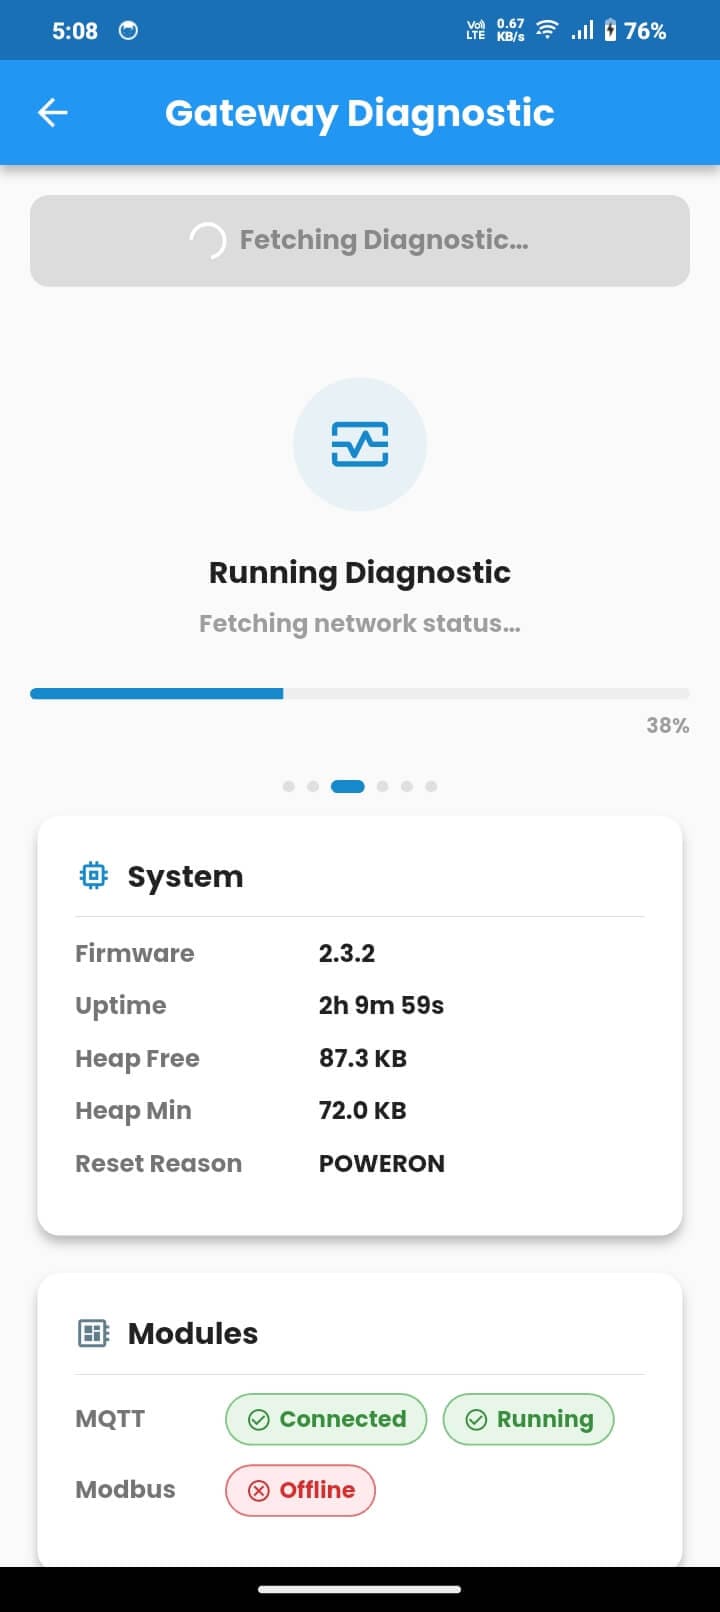
Gateway Diagnostic
Gateway Diagnostic provides a real-time health snapshot of every subsystem inside the connected gateway.
Open Gateway Diagnostic from the drawer. The app automatically requests diagnostic data from the gateway. Pull down to refresh anytime.
| Diagnostic Item | Description |
|---|---|
| System — Firmware | Current firmware version installed on the gateway |
| System — Uptime | Time the gateway has been running since the last restart |
| System — Heap Free | Available RAM on the gateway |
| System — Reset Reason | Reason for the last gateway restart, such as SOFTWARE, POWERON, or BROWNOUT |
| Modules — MQTT | Whether the MQTT client is connected and running |
| Modules — Modbus | Whether the Modbus interface has been initialized |
| Wi‑Fi | Status, SSID, live IP, RSSI, and quality rating |
| Ethernet | Link status, IP address, subnet, and gateway |
| GSM | Cellular connection status, signal quality, and carrier-assigned IP |
| SD Card | Presence, total capacity, free space, and usage percentage |
OTA Firmware Update
AdiNexusFT can update gateway firmware wirelessly over BLE, removing the need for USB access to the gateway.
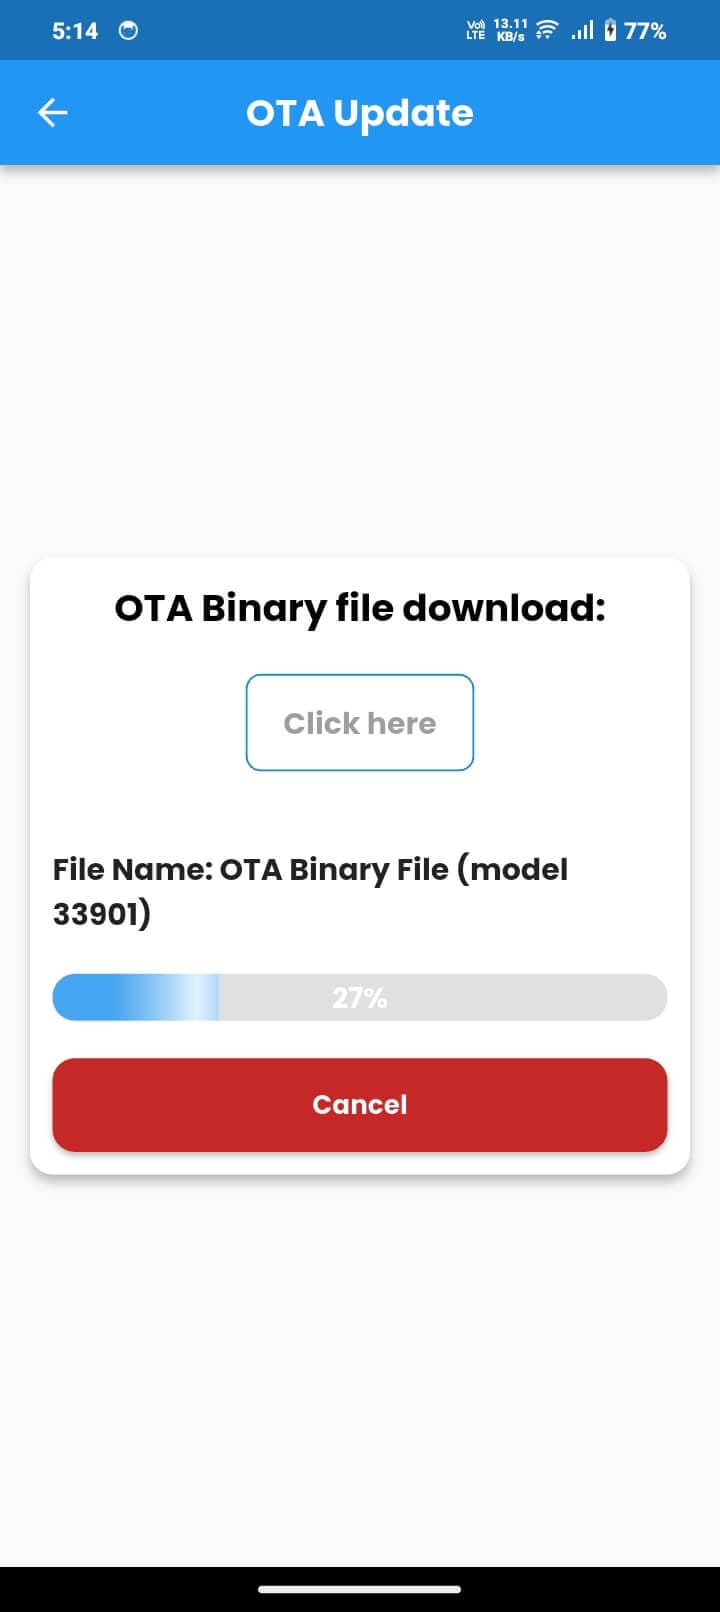
How to Perform an OTA Update
Gateway Logs
Gateway Logs retrieves log files stored on the gateway SD card. These logs capture network events, sensor data, errors, and system messages.
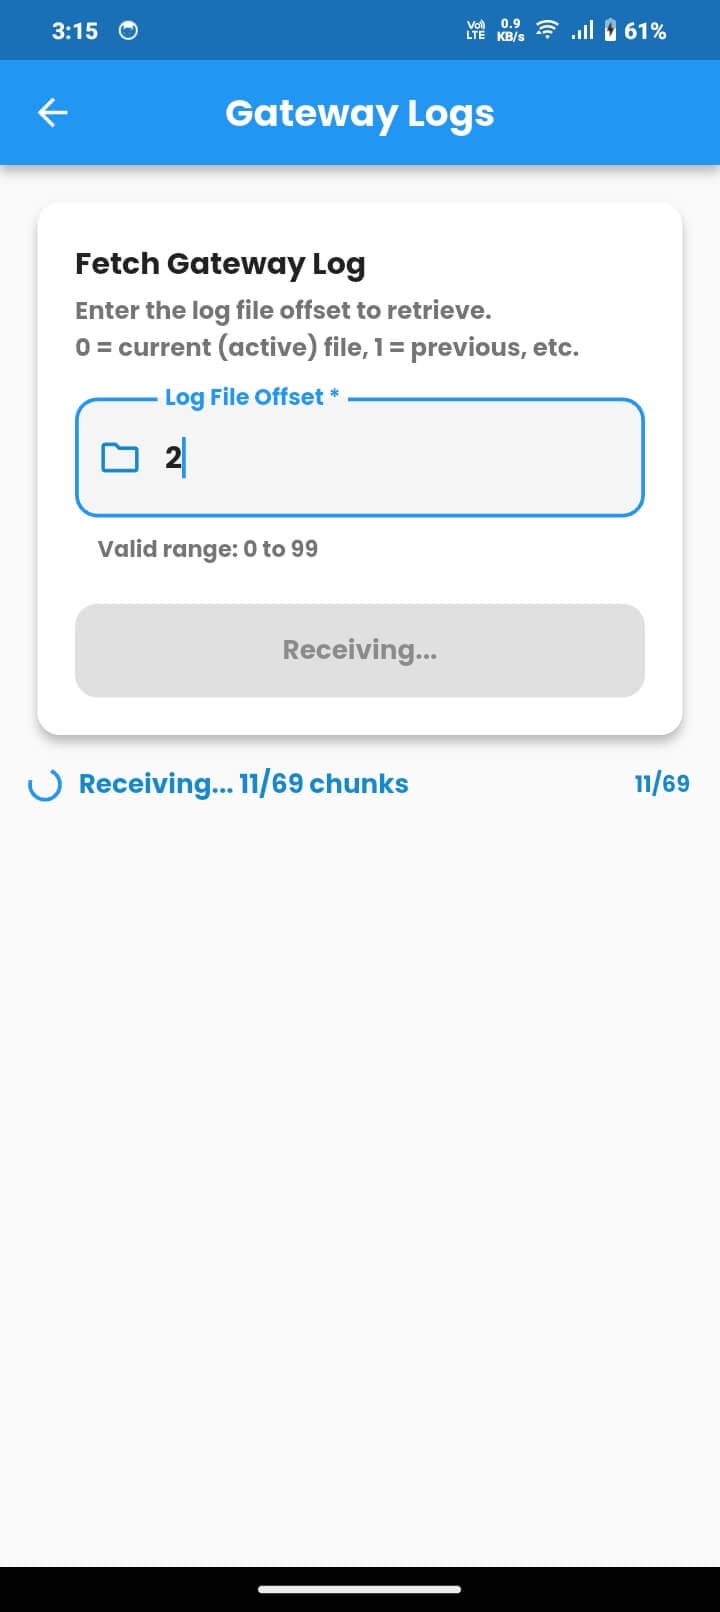
9.1 Fetching a Log File
| Offset | Meaning |
|---|---|
| 0 | Current active log file being written now |
| 1 | Previous log file |
| 2 | Two rotations back |
| 3–99 | Progressively older log files, up to the maximum stored on the SD card |
9.2 Reading the Log
Each log line follows the format Level, Timestamp, Module, Message.
Example Log Lines
W,0101054033,HEAP,Free heap: 101744 bytes
E,0101054045,NW,No interface has internet connectivity
I,0101054046,WIFI,Wi‑Fi disconnected
Severity Levels
- W — Warning
- E — Error
- I — Info
- C — Critical
9.3 Copying Log Content
Tap the copy icon on the Log Content card to copy the entire log to your clipboard and share it through email or messaging for remote diagnosis.
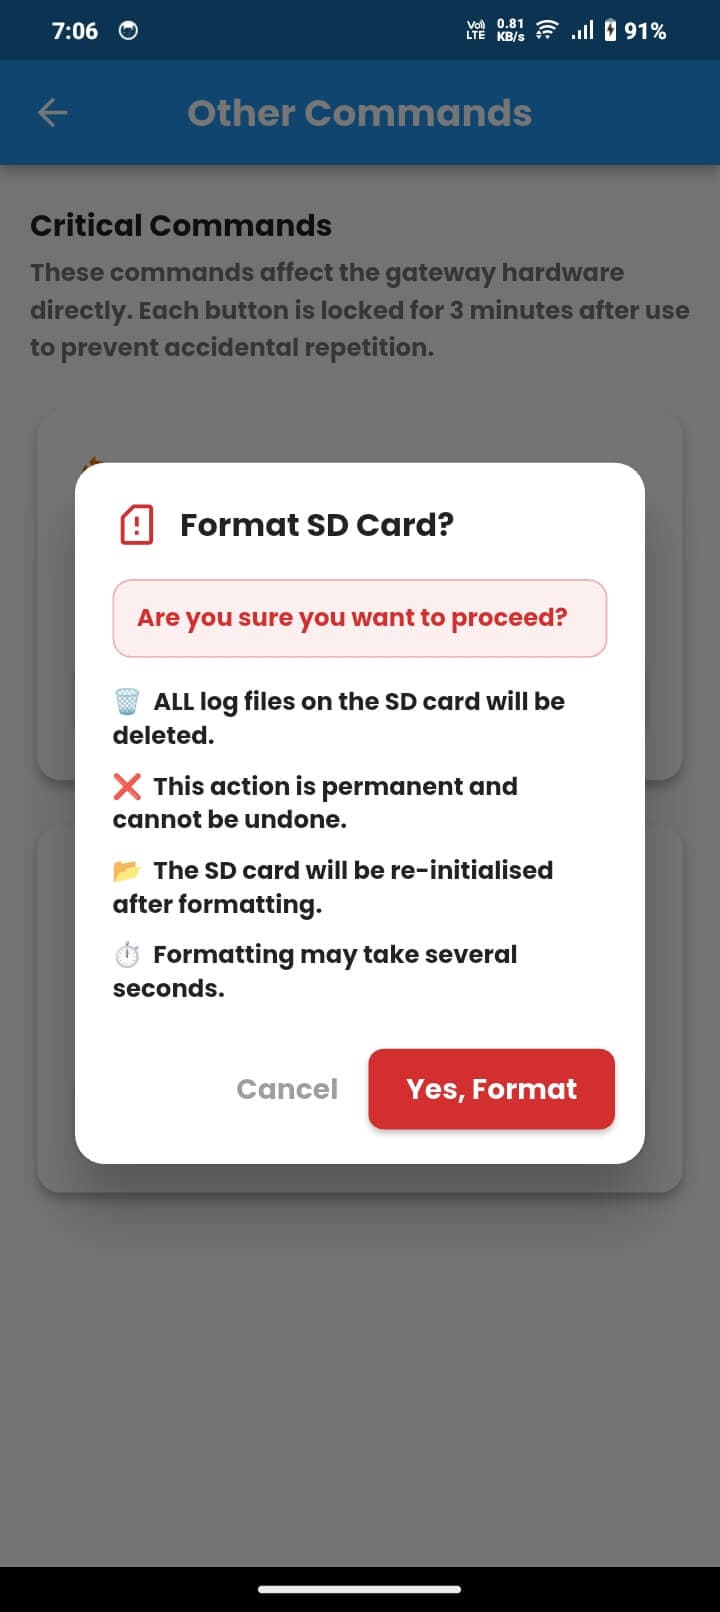
Other Commands
The Other Commands screen provides direct hardware control commands. Each button is locked for 3 minutes after use to prevent accidental repetition.
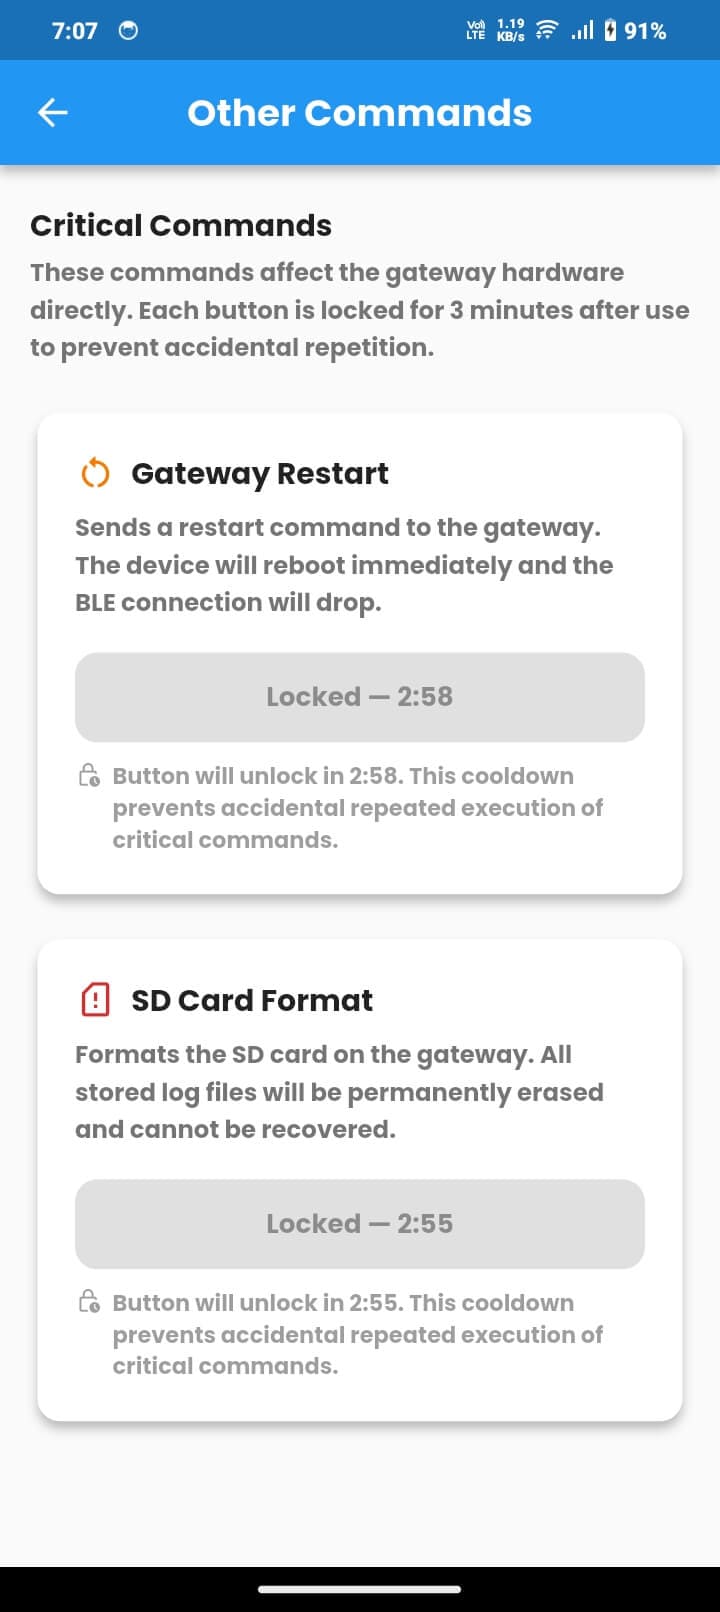
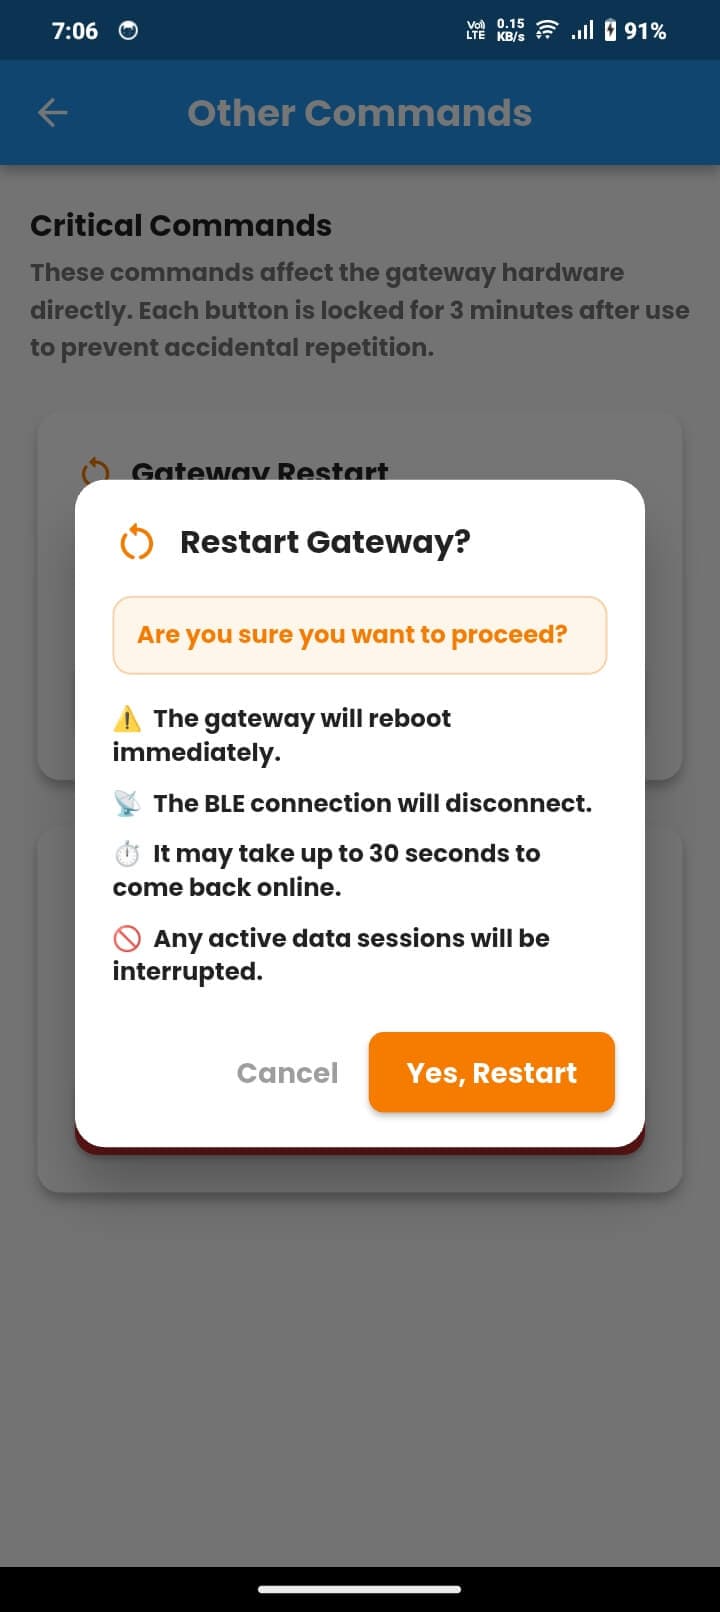
10.1 Gateway Restart
Sends a restart command to the connected gateway. Use it to apply configuration changes, recover from an unresponsive state, or perform maintenance.
10.2 SD Card Format
Formats the SD card and permanently erases all stored log files. Use only when the SD card must be cleared, such as when full or corrupted.
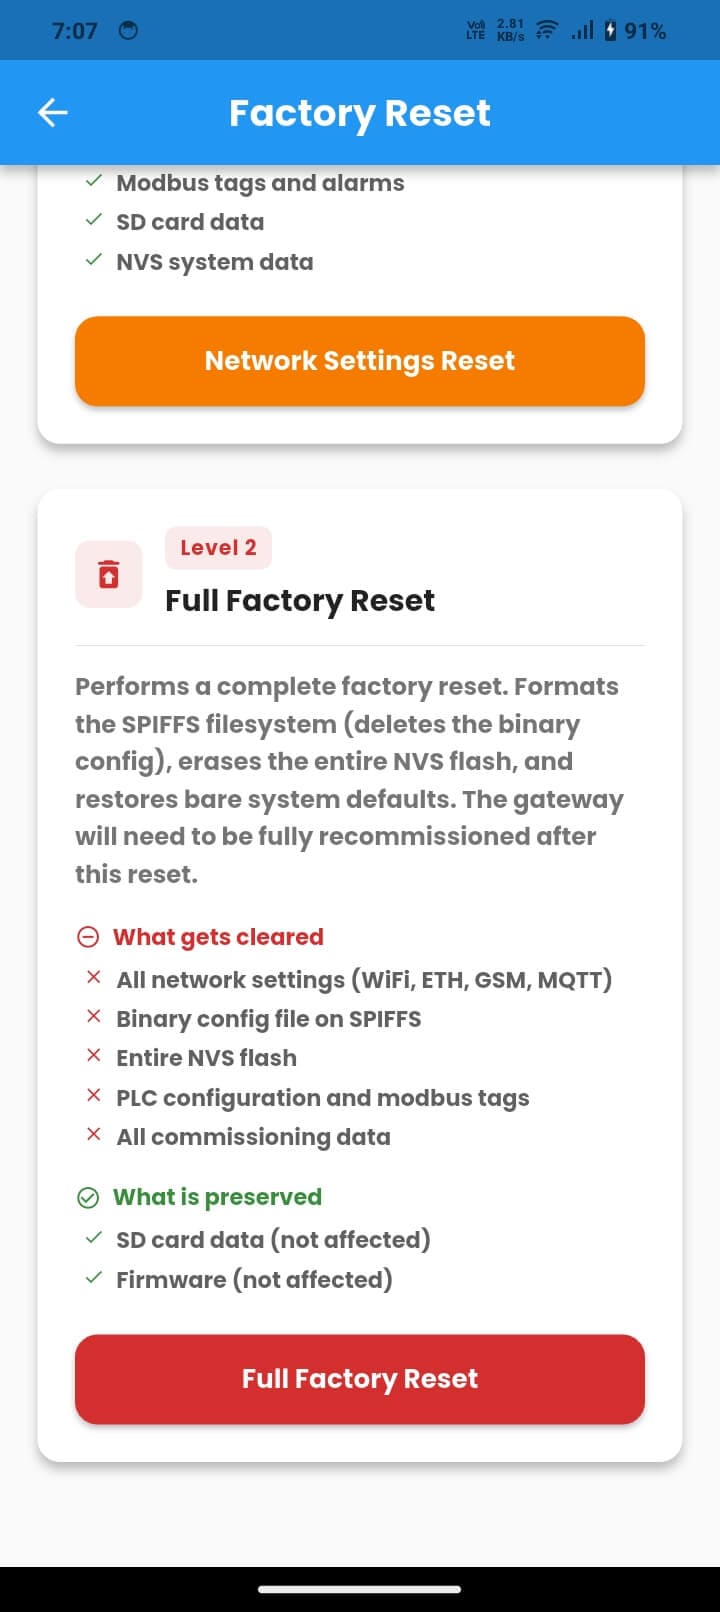
Factory Reset
Factory Reset restores gateway settings to default state. Two reset levels are available, each with a different scope.
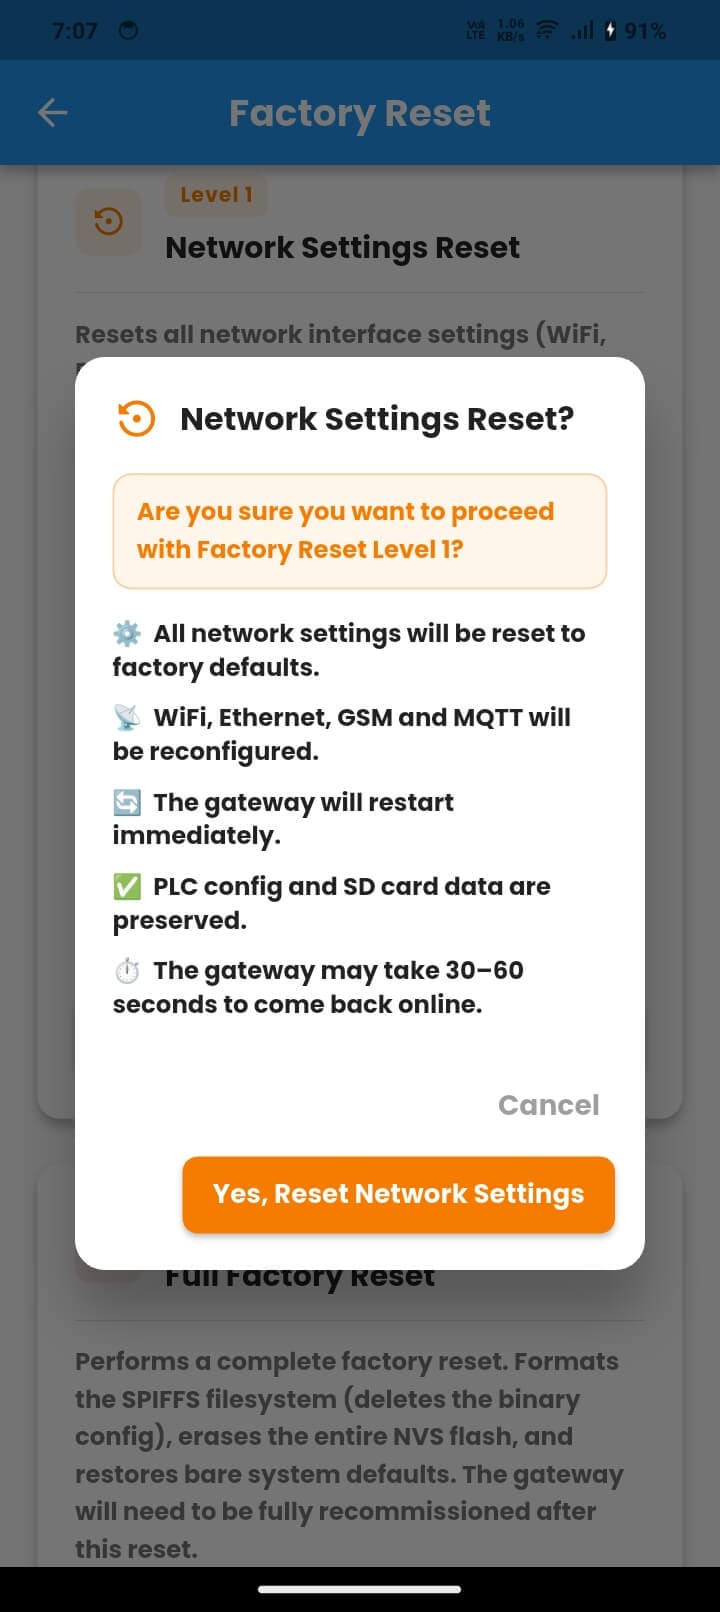
11.1 Level 1 — Network Settings Reset
Resets all network interface settings back to factory defaults. The binary configuration file is rewritten with default values.
- Cleared: Wi‑Fi SSID and password, Ethernet IP settings, GSM/APN settings, MQTT broker settings
- Preserved: PLC configuration, Modbus tags and alarms, SD card data, NVS system data
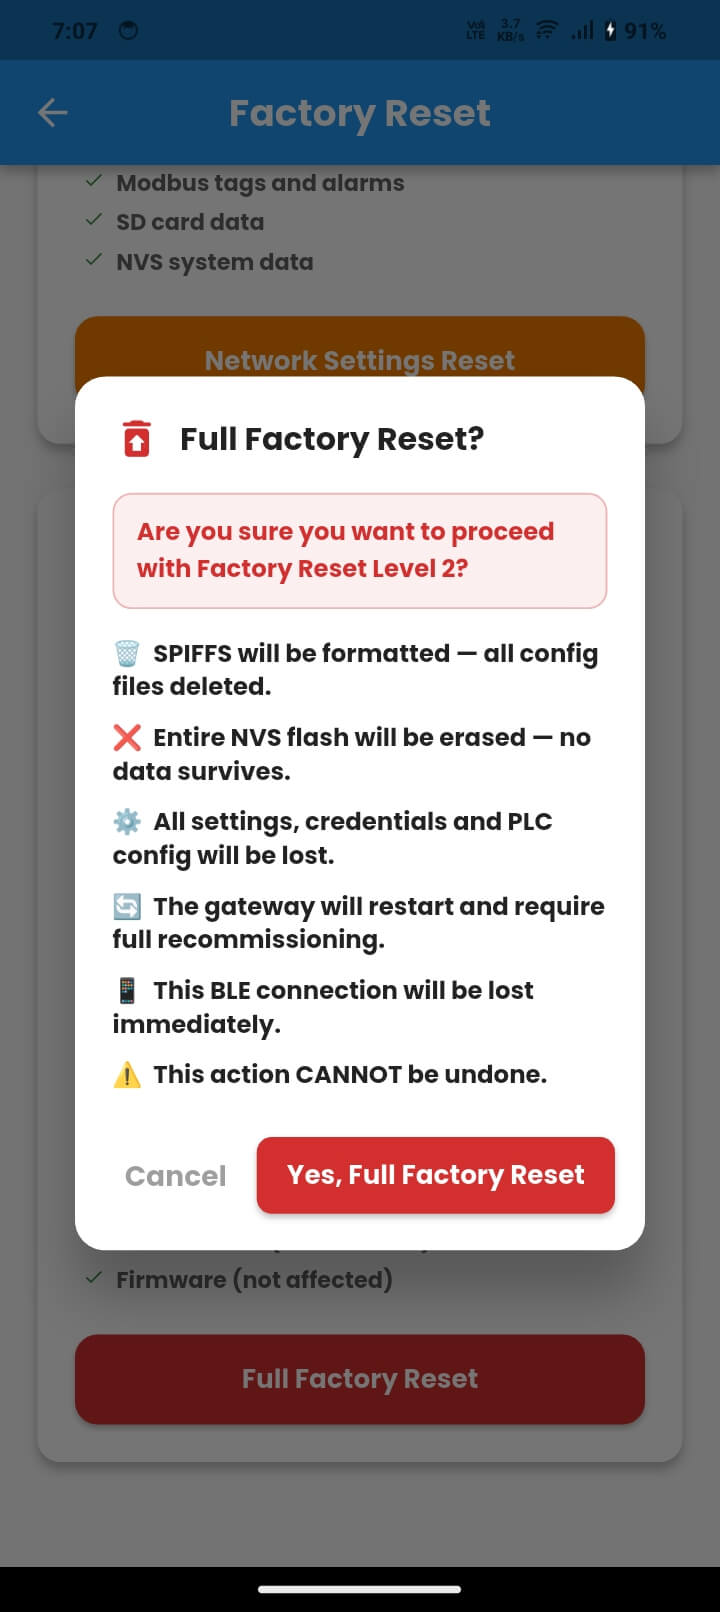
11.2 Level 2 — Full Factory Reset
Performs a complete factory reset. The SPIFFS filesystem is formatted, NVS flash is erased, and the gateway is returned to bare system defaults.
- Cleared: All network settings, binary config file on SPIFFS, entire NVS flash, PLC configuration, Modbus tags, and all commissioning data
- Preserved: SD card data and firmware
Troubleshooting
Use this section to resolve common issues during gateway login, connection, commissioning, update, and diagnostics.
| Problem | What to Do |
|---|---|
| Gateway not appearing in Bluetooth scan | Ensure the gateway is in BLE commissioning mode, LED alternating red/blue. Hold the commissioning button for 10–20 seconds, move within 5–10 metres, and tap Scan again. |
| Access Denied when connecting | Your account does not have permission for this gateway. Contact your administrator or supplier to add the gateway to your account. |
| BLE connection drops during configuration | Move closer to the gateway, ensure no other phone or tablet is connected to the same gateway, and retry the operation. |
| Login fails with correct credentials | Check your phone internet connection and verify Client ID and Username exactly as provided. Contact your administrator if needed. |
| Configuration sent but gateway still using old settings | Wait 30 seconds for restart, reconnect, run Gateway Diagnostic, and if needed send the configuration again. |
| OTA update fails or progress stops | Keep the phone within BLE range and the screen active. If progress stops, tap Send File again. The gateway remains on valid firmware. |
| Gateway Logs returns “file not found” | The offset is higher than the number of available log files. Try a lower offset. Offset 0 always returns the current log. |
| Gateway Diagnostic shows MQTT Offline | Verify the MQTT broker address, port, and credentials, and confirm the active network interface has a valid IP address. |
12.2 Getting Support
Quick Reference — First-Time Commissioning Checklist
Use this checklist when commissioning an AdiNexus gateway for the first time.
